Blog

The Improv Duet Game

Most of the kids love improv, and this activity has the advantage of developing their sense of beat and musicality at the same time.

What You Need:

  • A spinner (or 2 dice if you prefer)
  • A blank piece of paper
  • Coin for tossing (optional)

Setup:

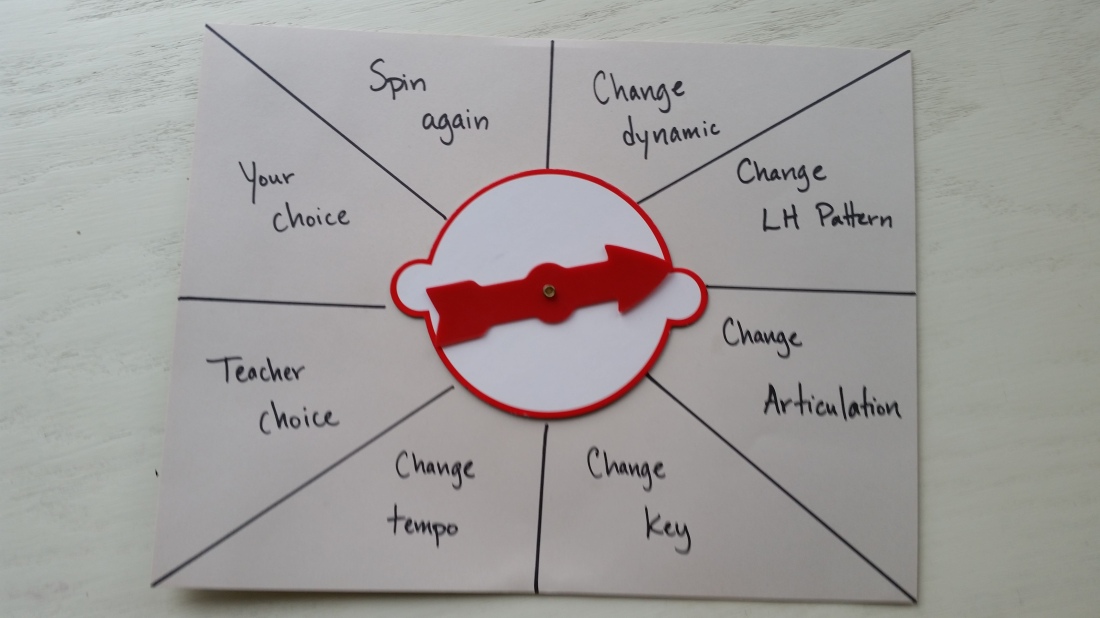
  • If you are using a spinner, place it in the center of your page and section off the paper (see the picture). In each section, write one way to change up an improv. For example, change dynamic, change accompaniment pattern, change articulation, change key signature, change tempo, teacher’s choice, student’s choice, spin again, etc.
  • If you are using dice, write down the numbers 2-12 and assign each number one of the ways to change up an improv.

How to Play:

  • Explain that this improv game is going to use a chord progression: I – IV – V  – I if the student’s had enough music theory to understand that or Cmaj – Fmaj – Gmaj – Cmaj if they haven’t. Each chord is going to get one full measure, so the improv will be a four measure improv. Play each of those block chords as whole notes for the student. That is how long they have to create an improvised melody and return to the home note (or tonic).
  • To start with the most basic improv, the teacher will play those four measures while the student improvises a melody. You can do this several times if the student needs help understanding when to wrap up the melody.
  • After that it is time to mix things up. Have the student spin the spinner or roll the dice. Whereever they land, they need to follow those instructions (change the dynamic, tempo, etc.). If they land on change the accompaniment, move out of block chords into some other pattern, like arpeggios, oom-pa, etc., but keep the chord progression the same.
  • Repeat as many times as you have time for.
    • Depending on the level of the student, you can either make each new spin a fresh improv or you can make the changes cumulative so that you end up playing, for example, in D major, presto, and fortissimo all at the same time.
    • Also depending on the level of the student, you can flip the coin each time to determine who is on melody and who is doing the accompaniment.

20180921_080318


Poison Rhythm Game

Poison Rhythm Game


The poison rhythm game is commonly done in group settings, but here is an adaptation for a private lesson.

What You Need:

  • Paper
  • Writing utensil
  • Drums or other percussion instruments (optional)

Setup:

  • None

How to Play:

  • Write out one measure of rhythm in 4/4 time and place it where both players can see it. This is the poison rhythm.
  • The teacher plays a measure in 4/4 time (not the poison rhythm). If you’re not using instruments, just clap the rhythm. The student should listen carefully and play or clap it back.
  • Repeat the call and response rhythms as many times as you like.
  • At some point, the teacher should play the poison rhythm. The student should NOT play back the poison rhythm. If they stop and do nothing, they have earned a point. If they are not paying attention and do play it back, the teacher earns a point.
  • Write a new poison rhythm and go again. The game ends whenever you run out of time.

Variations:

  • To make it easier, use only basic rhythms, count out loud, and give the student multiple chances to play back each rhythm.
  • To make it harder, use more complicated rhythms or make each rhythm two measures long.
  • To make it more creative, switch roles so that the student is generating all the rhythms.


Race to the Top (Note Review)

Yet another way to drill note names, with the added bonus that it drills intervals too.

What You Need:

  • A large grand staff
    • Mine is on a whiteboard, but a paper version would work just as well.
  • Writing Utensil
  • One Die
    • I made up a special die with the numbers 2, 3, 4, 5, 8, and *, but you could make it work with a regular die.

Setup:

  • None

How to Play:

  • Each player should draw a whole note F hanging below the bass clef staff. That is the initial starting point for the race.
  • Let the student roll the die. That number specifies her interval. She needs to draw in a whole note which is that interval directly above her starting F. For example, if she rolls a 2, she should draw in the G, which is a second above the F. If she rolls a 5, she should draw in the C, which is a fifth above the F. She should name the note as well as draw it in.
  • The asterisk side of the die means different things depending on the age and ability of the student. It could mean roll again, teacher chooses the interval, student chooses the interval, or teacher loses a turn.
    • If you are using a regular die, use the number one for this, since no one wants to draw in a unison anyway.
  • Teacher takes a turn and draws the correct note above her own F.
  • Repeat the process, taking turns until someone reaches the G just above the treble clef staff. First one to the top wins.

Variations:

  • For pre-readers, use a picture of a keyboard instead of a staff.
  • To make it harder, require the student to say whether a given interval is major, minor, perfect, etc.
  • To make it more likely the student will win, the asterisk can mean different things depending on whether the teacher or student rolls it. Also, I’ve found I can usually be careful where I roll the die and prevent the student from seeing what it says. Then I can make my intervals small enough to ensure I lose.

Untitled


Compose Your Own Rhythm Duets

I’ve got some kids who just aren’t feeling the rhythm. This is what I came up with for them.

What You Need:

  • A die
  • A blank sheet for rhythm duets.
    • I printed it only once and put it in sheet protectors.
  • Pencil (or whiteboard marker if you’re using the sheet protectors)
    • Alternatively, you can skip the composing your own rhythm idea and just use flashcards with rhythms on them (each one needs one measure).
  • Special 6 Cards

Setup:

  • Shuffle the Special 6 cards
  • Write out what note values you want to go with each number on the die. For example, 1 = quarter note, 2 = half note, etc. Depending on the ability level of the student, some might be two eighth notes or a dotted quarter note. Reserve 5 for wild and 6 for the Special 6 card.

How to Play:

  • Student rolls the die. They need to create a measure in 4/4 time that includes at least one of whatever note value they rolled. Write their rhythm in one of the measures on their line (it does not have to be the first measure).
    • For most students, I had them count and clap the measure first and then write it because I want them to feel the beat more than I want them to be able to add up to four beats. But if they struggle with that, you could do it the other way around.
    • Most students also wrote their own rhythm down. I only did it for the youngest ones.
    • If you roll a 5 (wild), there are no restrictions. Any note values are fine.
    • If you roll a 6 on the first turn, just roll again. If you roll a 6 on subsequent turns, draw a special 6 card, follow the instructions, and roll again.
  • Teacher takes a turn and creates a measure on her own line.
  • Once you both have a measure, count and clap your lines as a duet.
    • If a measure has nothing in it yet, treat it as a whole rest.
    • For every measure done correctly, award one point. (Don’t count the rest measures.)
  • Repeat the process, except count and clap the duet and award points after each person has a turn. This ensures the student always has a chance to remain a point ahead. Continue until you fill all the measures or you run out of lesson time.

silhouette-3275055_1280