May 2018 Plans

Here’s what we did in May:

Week 1: We practiced different playing at different tempos with the Body Percussion Tempo Challenge.

Week 2: We reviewed notes with the Paint Chip Board Game (How to Drill Anything).

Week 3: We practiced rhythms with Rhythm Duets on Chimes or Bells.

Week 4: This week was the end of the school year for all my kids, so we did a Summertime Improv.

Week 5: We attempted to make sight reading less boring with Sight Reading Spin the Bottle.

Sight Reading Spin the Bottle

Sight Reading Spin the Bottle

Sight reading is such a valuable skill. It’s a shame most students find it so boring. Here’s my latest attempt to make it something other than torture.

What You Need:

  • A bottle to spin
  • 8 index cards or pieces of paper
    • 6 of them should say “Sight Reading”
    • 2 of them should have something more fun. Mine said “Review Song (your choice)” and “Drumming”

Setup:

  • Arrange the cards in a circle on the floor with the bottle in the middle.

How to Play:

  • The student spins the bottle. We do whatever is on the closest card it points to.
  • Obviously, it will usually fall on sight reading. Here are the cardinal rules of sight reading.
    • Choose music that is otherwise too easy for the student. I generally go about one full level behind wherever they are.
    • Remind them to look all the way through the passage before starting.
    • Choose a slow tempo.
    • Don’t stop.
  • If the bottle pointed to drumming, we alternated making up rhythms and playing them back on the drums.
  • If the bottle pointed to review song, they picked and played whatever previous song they wanted.
  • Spin again for the next round.

Modifications:

  • If they get frustrated, remove some of the sight reading cards to give them a better chance of getting the fun cards.

Summertime Improv

Summertime Piano Improv

School’s out here, and we needed an absolutely no prep work activity.

What You Need:

  • Paper
  • Writing Utensil

Setup:

  • None

How to Play:

  • First, brainstorm about a few things that are fun to do in the summer. Swimming, climbing trees, jumping on a trampoline, etc., are all great choices.
  • When you’ve chosen an activity, ask the student questions and write down answers until you have a little story. For example, several of my students chose swimming:
    • How do you like to enter the pool? One toe at a time or cannonball? How would we portray that through music? Would it be slow or fast? Loud or soft? One gentle note at a time or an accented splat on the keys?
    • Once you are in the pool, what do you like to do? Swim laps? Dive deep? What is going to happen to the music?
    • Are there other people in pool? Will there be any splashing? Marco Polo? Flips upside down?
    • How does it end? Does everyone quietly and calmly dry off and go inside? Or is there one final cannonball at the end?
  • Once you have a sequence written down and the student understands what it means in musical terms, it’s time to play. I suggest playing in C major. Start out with a left hand pattern that matches the theme as best you can. Gently lapping water is fairly easy for swimming. Other subjects might not have such an obvious pattern, but that’s okay.
  • After listening to your introduction, the student should start improvising. Some of them will naturally move through the sequence on their own. Others you will have to tell when to move on to the next step and when to wrap it up.
  • Afterwards, talk about what was good about it and what could be added on a second run. For example, could they use more of the keyboard? Could the dynamic contrast be more dramatic? Could they add another sequence into their story? Play it again if you have time.

Rhythm Duets on Chimes or Bells

xylophone-43574_1280
Rhythm Duets for Private Lessons

Technically, you don’t need chimes to do this activity. You can just clap the rhythms or use a piano, but the kids will love chimes or bells if you have them.

What You Need:

  • Rhythm Flashcards (one measure per card)
  • Chimes, bells, a xylophone, or some other pitched instrument
    • Preferably, each note should be on a different bell or chime, rather than part of a fixed keyboard.

Setup:

  • None

How to Play:

  • The student picks a bell. He draws a card and plays that rhythm on the bell counting aloud.
  • He draws two more cards and counts and lays them with the first to make a rhythm that is three measures long.
  • When he is confident with the rhythm, the teacher can choose a different bell and play along. (Choose a bell in the same chord.)
  • The student can then draw three cards for the teacher. Then they play a duet where the two rhythms are different. Many students have trouble holding onto their rhythm, so this is good for independence.
  • Finally, give the student three bells that form a triad. The student should then play the rhythm again, but move between the three bells in any order they choose. Because all the notes are in a chord, it will make a pretty melody.
    • If you are using a xylophone that cannot have the bells removed, you can still point out the right notes, but there is a much higher likelihood that the student will miss.

Variations:

  • To make it easier, limit the rhythms to quarter notes, half notes, and whole notes (the first page in this set).
  • To make it harder, increase the number of measures or use harder rhythms. You can also try having them play two different rhythms at the same time, one with the left and one with the right.

Paint Chip Board Game (How to Drill Anything)

Paint Chip Board Game


The problem with most music board games is that they are so specific to one concept that at any given time, they aren’t appropriate for most of my students. Here’s a generic one that is practically free, takes about 10 minutes to make, and can be tailored on the fly for any student.

To Create the Board:

  • Paint chips with three obviously different colors. I did yellow, green, and blue.
  • Card stock in a contrasting color
  • Sharpie Marker

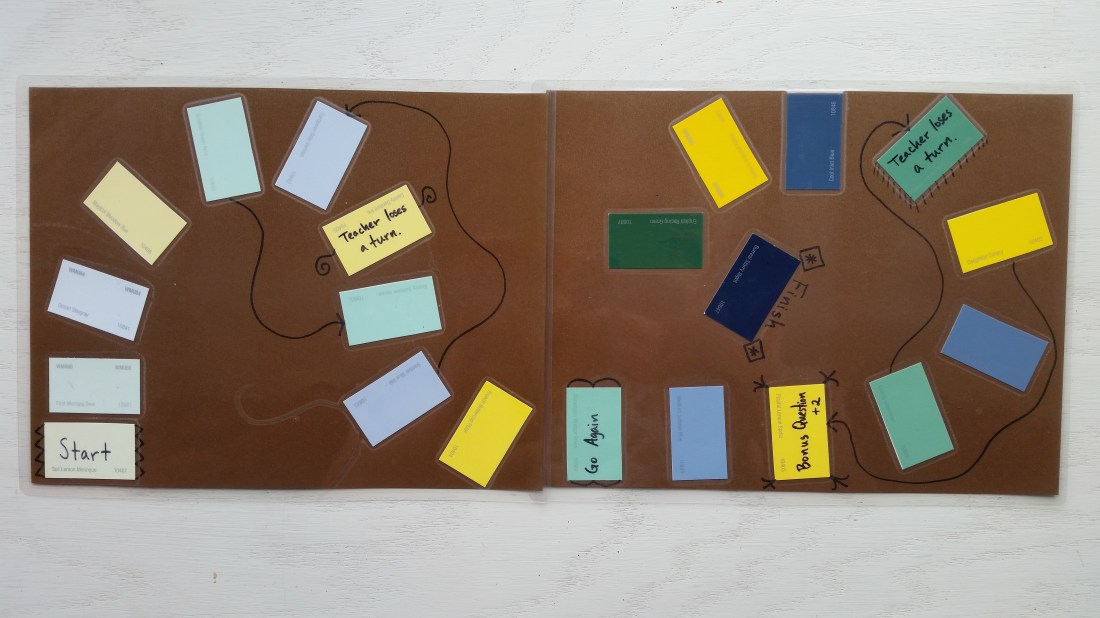
Cut out the paint chips so you have stacks of squares or rectangles in each of your three colors. Mine range from pastels to brights, but as long as each stack is identifiably one of your three colors, it’s fine. Glue your squares onto the cardstock in alternating colors. The layout should make a wavy line (see the picture below). With the Sharpie, label the first one as Start and the last one as Finish. To add interest, draw a few arrows from certain squares to shortcut either forward or backward. In a couple of squares, write things like “Teacher loses a turn,” or “Go Again” or “Bonus Question (move forward two more spaces if you get it right).” When you’re done, I suggest laminating the cardstock to make it more durable, but you could also just slip it in a sheet protector.

What You Need to Play:

  • Your game board
  • Two game pieces (you can use coins, erasers, paper clips, whatever)
  • One die
  • Three sets of flashcards, separated by subject
    • For example, treble clef notes, bass clef notes, intervals, key signatures, or rhythms.

Setup:

  • Decide which set of flashcards corresponds with which color on your board.
  • Place two game pieces on Start.

How to Play:

  • The student rolls the dice and moves forward that many squares. She then draws a flashcard from the stack that corresponds with the color she has landed on and answers the question. (If she gets it wrong, I just give her enough hints so that she eventually gets it right.)
  • I take a turn. The only difference is that if I get it wrong and the student catches me, I have to move my game piece back to where I was before.
    • This encourages the student to pay attention during my turn and also ensures that they always win. If my dice throws happen to be luckier than the students, I just start getting a lot of questions wrong.
  • First person to get to the Finish line wins.

Variations

  • The difficulty of this game is entirely controlled by which flashcards you choose. To make it harder, just use progressively harder concepts, even if you don’t have exact flashcards for it. For example:
    • Draw a note flashcard and play the major (or minor or diminished or augmented) chord with that note as the root.
    • Draw a note flashcard and name the note that is a perfect fifth above it (or any other interval).
    • Draw a key signature flashcard and improv a melody in that key.

20180511_143344