Yet another way to drill note names, with the added bonus that it drills intervals too.
What You Need:
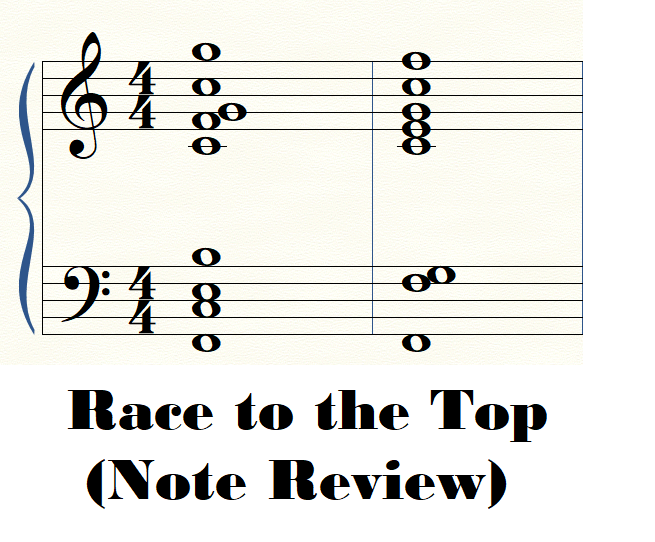
- A large grand staff
- Mine is on a whiteboard, but a paper version would work just as well.
- Writing Utensil
- One Die
- I made up a special die with the numbers 2, 3, 4, 5, 8, and *, but you could make it work with a regular die.
Setup:
- None
How to Play:
- Each player should draw a whole note F hanging below the bass clef staff. That is the initial starting point for the race.
- Let the student roll the die. That number specifies her interval. She needs to draw in a whole note which is that interval directly above her starting F. For example, if she rolls a 2, she should draw in the G, which is a second above the F. If she rolls a 5, she should draw in the C, which is a fifth above the F. She should name the note as well as draw it in.
- The asterisk side of the die means different things depending on the age and ability of the student. It could mean roll again, teacher chooses the interval, student chooses the interval, or teacher loses a turn.
- If you are using a regular die, use the number one for this, since no one wants to draw in a unison anyway.
- Teacher takes a turn and draws the correct note above her own F.
- Repeat the process, taking turns until someone reaches the G just above the treble clef staff. First one to the top wins.
Variations:
- For pre-readers, use a picture of a keyboard instead of a staff.
- To make it harder, require the student to say whether a given interval is major, minor, perfect, etc.
- To make it more likely the student will win, the asterisk can mean different things depending on whether the teacher or student rolls it. Also, I’ve found I can usually be careful where I roll the die and prevent the student from seeing what it says. Then I can make my intervals small enough to ensure I lose.